10 July 2014

Tomb Raider - Essential Tweaks

Here are the tweaks I applied to the Steam version of Tomb Raider. Whenever I install a new game, it takes some time to find all the essential tweaks necessary to run the game flawlessly. This post is just a collection of the most important tweaks, all in one place, as they work for me to get almost always 60 FPS while reducing system heat as much as I can without sacrificing to much visual quality.

System Setup

I run the game on a PC with the following components and drivers:

I installed only the Graphics Driver, the HD Audio Driver and the PhysX System Software and left the other drivers unchecked. I always choose a custom installation when updating my drivers, which provides the option to enforce a clean installation.

Startup Tweaks

By default the game starts the game launcher instead of the game itself. This becomes kind of annoying after you have configured the game to your liking. Hence, skipping the game launcher is our first choice. Open your steam game library and right-click the Tomb Raider game icon. Select Properties from the context menu and press the SET LAUNCH OPTIONS... button. Add the value -nolauncher and press the OK button.

Performance Tweaks

The game uses the DirectX 11 renderer by default. Changing the renderer to DirectX 9 may result in a boost of up to 25% FPS while sacrificing very little visual quality. To force the game to use DirectX 9, press the Windows Start button and type regedit into the search field. Press enter which launches the registry editor and navigate the registry by following this path:

HKEY_CURRENT_USER\Software\Crystal Dynamics\Tomb Raider\Graphics

Change the value of the entry RenderAPI from 0 to 9.

That's it. I hope you enjoy playing Tomb Raider without having low FPS or too high GPU heat.

Logged Off: Harmlezz

Tweak Sources

09 July 2014

Spec Ops: The Line - Essential Tweaks

Here are the tweaks I applied to the Steam version of Spec Ops: The Line. Whenever I install a new game, it takes some time to find all the essential tweaks necessary to run the game flawlessly. This post is just a collection of the most important tweaks, all in one place, as they work for me to get almost always 60 FPS while reducing system heat as much as I can without sacrificing to much visual quality.

System Setup

I run the game on a PC with the following components and drivers:

I installed only the Graphics Driver, the HD Audio Driver and the PhysX System Software and left the other drivers unchecked. I always choose a custom installation when updating my drivers, which provides the option to enforce a clean installation.

The tweaks require you to edit the files SREngine.ini and SRInput.ini which can be found in the folder located at:

C:\Users\%USERNAME%\Documents\My Games\SpecOps-TheLine\SRGame\Config

Those files are encrypted and have to be decrypted before you can edit them. Download the tool from here and extract the three files contained in the archive directly into the configuration folder mentioned above, so they are located side by side with all the *.ini files.

Just drag-and-drop the *.ini file you want to edit over the Gibbed.SpecOpsTheLine.IniDecrypt.exe file before you start editing it and drag-and-drop the same file over the Gibbed.SpecOpsTheLine.IniEncrypt.exe when you are done editing it.

Startup Tweaks

Watching advertisement videos over and over again is very annoying and time consuming. Hence it's best to disable as many of them as possible. In the file SREngine.ini find the section [FullScreenMovie] and prepend a semicolon to the following lines, make them look like this:

;StartupMovies=legal
;StartupMovies=ESRB_Screen
;StartupMovies=legal_logo_screen
;StartupMovies=UnrealLogo
;StartupMovies=2KLogo
;StartupMovies=YagerLogo
;StartupMovies=2KDemo_Warn
;StartupMovies=StartupMovie

Performance Tweaks

The most important tweak to boost FPS and reduce overall system heat is to disable depth of field. I gained a reduction of total GPU heat of 3 degree. In the file SREngine.ini find the section [SystemSettings] and adjust the value of the following property as shown below:

DepthOfField=False

Control Tweaks

If you play with a keyboard and mouse you may notice some kind of mouse acceleration when moving your mouse too fast. To improve aiming with the mouse I just disabled smoothing. In the file SRInput.ini find the section [Engine.PlayerInput] and adjust the value of the following property as shown below:

bEnableMouseSmoothing=false

That's it. I hope you enjoy playing Spec Ops: The Line without having low FPS, high GPU heat or aiming issues.

Logged Off: Harmlezz

Tweak Sources

05 January 2014

Borderlands 2 - Essential Tweaks

These are the tweaks I applied to the Steam version of Borderlands 2. Whenever I install a new game, it takes some time to find all the essential tweaks necessary to run the game flawlessly. This post is just a collection of the most important tweaks, all in one place, as they work for me to get almost always 60 FPS.

System Setup

I run the game on a PC with the following components and drivers:

I installed only the Graphics Driver, the HD Audio Driver and the PhysX System Software and left the other drivers unchecked. I always choose a custom installation when updating my drivers, which provides the option to enforce a clean installation.

There is a glitch with the newest GeForce driver when using Firefox having hardware acceleration checked, causing Windows 7 to freeze completely. To solve the problem, either install a previous driver version or just uncheck hardware acceleration at: Options | Advanced | General | Browsing

Most of the tweaks require to edit either the file WillowEngine.ini or WillowGame.ini which can be found in the folder located at:

C:\Users\%USERNAME%\Documents\My Games\Borderlands 2\WillowGame\Config\

Driver Tweaks

This are the tweaks I applied using the NVidia Control Panel. There are some tweaks, like enabling Vertical Sync, which can be applied using the in-game options, but I prefer to do them in one place if they are tightly related.

The NVidia Control Panel can be accessed by the context menu, which appears when right-clicking on the desktop. First I had to select 3D Settings | Manage 3D Settings | Program Settings and Add the executable borderlands2.exe, which is located at <Steam Home>\SteamApps\common\Borderlands 2\Binaries\Win32. The important settings I applied were:

  • Vertical sync set to On, to enforce my native refresh rate
  • Triple buffering set to On, to improve the performance
  • Maximum pre-rendered frames set to 1, to reduce the work and heat on my graphics card and to avoid potential input lag

I disabled Vertical Sync in the Borderlands 2 in-game options to avoid potential conflicts.

Startup Tweaks

Watching the advertisement videos again and again is very annoying and time consuming. Hence it's best to disable as many of them as possible. In the file WillowEngine.ini find the section [FullScreenMovie] and prepend a semicolon to the following lines to make them look like this:

;StartupMovies=2K_logo
;StartupMovies=Gearbox_logo
;StartupMovies=NVidia
;StartupMovies=Loading

The next thing you may do is skipping the splash-screen, which forces you to hit Play to start the game. To do that, navigate to your Steam Library and right-click the Borderlands 2 image. Select Properties from the context menu and under the tab General click the button labeled as SET LAUNCH OPTIONS... Add the option -nolauncher separated by a space, in case you already have other options set.

That's it. Now whenever you start Borderlands 2 you should be taken directly into the game, not seeing as many advertisement videos as before.

Cosmetic Tweaks

One of the most annoying and absolute unnecessary feature when playing on a PC is texture streaming of ammo. If not disabled, you have to watch blurred ammo textures most of the time. To make the ammo texture load instantly, find the four properties shown below in the file WillowEngine.ini and change their values accordingly:

MipFadeInSpeed0=0
MipFadeOutSpeed0=0
MipFadeInSpeed1=0
MipFadeOutSpeed1=0

I love the comic style textures of Borderlands 2, but do not like the black outline. A nice side-effect of disabling those lines is a gain in performance. Find the property in the file WillowEngine.ini and change its value as shown below:

DefaultPostProcessName=WillowEngineMaterials.RyanScenePostProcess

Performance Tweaks

The most important tweak necessary to prevent Borderlands 2 from dropping significantly in FPS when fighting many enemies in an environment populated with many animated objects, is to set the in-game video option PHYSX EFFECTS to low. I did not noticed any quality loss while playing with low physics effects, but the tweak reduced the drop in FPS significantly.

The second most important tweak in terms of retaining FPS is to reduce the time to pass before dead bodies and projectiles become eligible for removal. The more dead bodies and projectiles the Unreal Engine has to render, the worst the performance will be, especially in fights. This tweaks together with the tweak described above fixed almost all of the temporary performance issues I had. In the file WillowGame.ini find the properties shown below and adjust their values accordingly:

[WillowGame.WillowPawn]
SecondsBeforeConsideringRagdollRemoval=5.0
SecondsBeforeVisibleRagdollRemoval=15.0

[WillowGame.WillowProjectile]
SecondsBeforeConsideringRemoval=10.0

The third most important tweak helping to retain FPS is to reduce the total number of visible projectiles at one time. Reducing them does reduce the burden from the PhysX System which is under heavy load in fights otherwise. Due to the tweak above, projectiles are removed in time so you won't miss to many projectiles. In the file WillowEngine.ini find the properties shown below and adjust their values accordingly:

ApexLODResourceBudget=10.0
ApexDestructionMaxChunkIslandCount=5
ApexDestructionMaxChunkSeparationLOD=0
bEnableParallelAPEXClothingFetch=False

The following tweaks are optional, because their impact on performance aren't huge. But on the other side, you won't observe any visual losses as well. Hence, if you like to get the most out of your fights without loosing any visual quality, find the properties below in the file WillowEngine.ini and adjust their values as well:

bSmoothFrameRate=FALSE
DetailMode=0

[Engine.Engine]
PhysXGpuHeapSize=64

That's it. I hope you enjoy playing Borderlands 2 without having any low FPS issues when fighting your enemies.

Logged Off: Harmlezz

Tweak Sources

10 November 2013

Darksiders - Essential Tweaks

These are the tweaks I applied to the Steam version of Darksiders. I run the game on a PC with the following components:

Graphics Tweaks

Out of the box the game is running with more than 400 FPS, for example when showing the main menu or options menu. The in-game Vertical Sync option, which can be enabled by checking Options | Advanced Options | Vertical Sync didn't constraint the FPS to my refresh rate of 60 Hertz. Hence I left the in-game option unchecked and enforced Vertical Sync on my graphics card for Darksiders, by using the NVidia Control Panel.

The NVidia Control Panel can be accessed by the context menu, which appears when right-clicking on the desktop. First I had to select 3D Settings | Manage 3D Settings | Program Settings and Add the executable DarksidersPC.exe, which is located at <Steam Home>\SteamApps\common\Darksiders. The important settings I applied were:

  • Vertical sync set to On, to enforce my native refresh rate
  • Triple buffering set to On, to improve the performance
  • Maximum pre-rendered frames set to 1, to reduce the work and heat on my graphics card and to avoid potential input lag

Startup Tweaks

Whenever I started the game, I had to watch all the advertisement videos. Hitting the ESC key helped to speed up starting the game, but became annoying over time. Hence I determined which videos were played when starting the game and renamed them by changing the extension from .wmv to .wmv_. This common little trick did the job. All videos can be found at <Steam Home>\SteamApps\common\Darksiders\media\videos and the videos I renamed were:

  • AMD_Logo_movie
  • main_menu_intro
  • start_screen_intro
  • THQ_Logo1280x720
  • Vigil_Logo1280x720

Achievement Tweaks

It is imperative to exit Steam before starting to play or after playing Darksiders. In addition you should never tab out of the game. Instead save your progress and exit the game and Steam. Otherwise you will miss many achievements for Darksiders or any other game you start using the Steam client. This is a bug which never got fixed by any patch.

That were all the tweaks I applied to improve my gaming experience. Have fun playing Darksiders!

Logged Off: Harmlezz

06 January 2013

Become a Software Engineer by modding Fallout 3 - Tutorial Part 4

This is the fourth and final post of my tutorial Become a Software Engineer by modding Fallout 3. We are about to add the last two missing features to the Extra Perk: (a) rewarding the Player with an additional perk immediately after he gained more than half the experience points required to advance to the next level and (b) reducing the experience points gained by 50%. Currently the Extra Perk rewards the Player immediately when he levels up and does not reduce the experience points gained.

Like in my previous posts, I assume you know everything I explained before. If this is not the case, I would suggest you read those posts (Part 1, Part 2 and Part 3) before continuing with this one. Ready when you are!

What to expect behind the end?

How does feature (a) change the current behavior? At the moment, when the Player picks the Extra Perk, he won't get an additional perk for his current player level. But each time he levels up, he is rewarded with an additional perk, even for the maximum player level.

Implementing the new feature implies that we have to delay when to reward the Player with an additional perk. So when he picks the Extra Perk we have to reward him with an additional perk for the same level. But when he hit the maximum player level, he won't gain any more experience points. Hence we can't reward him with an additional perk for the maximum player level.

The moment when to reward the Player with an additional perk has shifted one half player level to the left. This is an important fact to consider when defining the criterion of when to terminate the execution of the QWEExtraPerkQuestScript (responsible to detect if the Player has gained enough experience points for an additional perk).

In the middle of nowhere

The formula for how to calculate the amount of experience points required, before gaining an additional perk is:

The function xp(playerLevel) returns the amount of experience points required to hit the player level playerLevel. You may wonder why we calculate the amount of required experience points in such a complicated way. A much simpler formula than the one above, which returns the same result in a perfect world, is:

(xp(playerLevel) + xp(playerLevel + 1)) / 2.

The reason why we choose the more complicated variant is to prevent a potential arithmetic overflow.

Most data types define a minimum and maximum value they are capable to represent. If we add some value greater than zero to the maximum value or subtract it from the minimum value, we get confronted with either an arithmetic overflow or arithmetic underflow exception or the calculation results in a value we did not expect. Hence, ensuring every calculation produces only values that are inside the boundaries defined by the data type of the result is very important.

The second formula adds two values and divides the result by 2. Adding two values may result in an arithmetic overflow if both values are positive and large enough or in an arithmetic underflow if both values are negative and small enough.

In contrast to the second formula, the first formula starts with a subtraction:

r1 = xp(playerLevel + 1) - xp(playerLevel)

whereas the first value to subtract from is a larger positive value than the second value to be subtracted. This calculation always results in a positive value smaller than the first value of the subtraction. Therefore the result r1 is inside the boundaries defined by the data type.

The first formula continues with a division:

r2 = r1 / 2 < r1

Dividing a positive value by a positive value greater than or equal to 1 results in either zero (due to truncation) or a positive value not larger than the value that got divided. This implies r2 as well is a value that is inside the boundaries, defined by the data type.

The last calculation performed by the first formula adds the result r2 to the second value of the first calculation:

r3 = xp(playerLevel) + r2 < xp(playerLevel) + r1 = xp(playerLevel + 1)

The value of r2 is smaller than twice its value, which is equal to r1, and if added instead results in the first value of the first calculation. And because this first value already is inside the boundaries defined by the data type, the value calculated by the first formula is always inside those boundaries as well.

The more complicated calculation has an advantage over the simpler calculation: it is fail-safe.

A shift to the left

We are almost ready to add the feature defined by (a) to the Extra Perk. But there is one last thing to decide first: when do we have to calculate the amount of experience points required by the Player, before he gets rewarded with an additional perk?

The first time we have to calculate that amount is when the Player picks the Extra Perk (which means in the initializer of the QWEExtraPerkQuest, the quest stage with an index of 0). And afterwards we have to calculate that amount every time when the Player was rewarded with an additional perk (in the function rewardXP defined by the QWEExtraPerkQuest, the quest stage with an index of 100). But we must not calculate the next amount when the Player got rewarded for the second last possible player level. This amount would be greater than the amount required to hit the last possible player level, which could cause an arithmetic overflow, right? So beware not to!

The formula for calculating the amount of experience points required to advance to a given player level is based on two game setting values: iXPBumpBase and iXPBase. Hence, when calculating the amount of experience points required we have to obtain those game settings using the G.E.C.K function getGameSetting <variable name>.

Let's add a quest stage with an index of 102 to the QWEExtraPerkQuest, acting as a function. I will refer to it by the name definePerkXP.

This function will calculate the amount of experience points required by the Player, before he gets rewarded with an additional perk. The result of the calculation will be stored in the variable perkXP, which we have to add to the QWEExtraPerkQuestScript. Make it look like the image to the left.

To address the changed criterion about when to terminate the QWEExtraPerkQuestScript, we have to move the conditional block responsible (demarcated by the lines 09: if and 11: elseif) to the top. This ensures that no calculation happens that is based on values not properly set. The conditional block can be interpreted as: if the Player has to be rewarded for the maximum player level or above, terminate the script.

Further the statement: 14: setStage QWEExtraPerkQuest 102 was added to the second conditional block (demarcated by the lines 11: elseif and 15: endif), which updates the value of the variable perkXP whenever the Player got rewarded with an additional perk. The function definePerkXP will not calculate a value for the variable perkXP if the player level is either lesser than one or if it is equal to or greater than the maximum player level.

Faster than light

Let's develop the quest stage function definePerkXP. It mainly relies on the function xp(plvl), which calculates the experience points required to reach the player level plvl. The function xp(plvl) is defined as:

xp(plvl) = (plvl - 1) * ((plvl - 2) * iXPBumpBase / 2 + iXPBase)

The new value we are about to calculate and assign to the variable perkXP (as described above) depends on two different player levels: the player level plvl for which to reward the Player with an additional perk and the next player level plvl + 1 the Player may reach.

Because of the fact, the G.E.C.K. does not allow defining the formula as a real function and because we do not want to introduce too many variables acting only as a sharing mechanism for temporary values across different scripts, we embed the formula into the function definePerkXP.

The new value to calculate is:

perkXP = xp(plvl) + (xp(plvl + 1) - xp(plvl)) / 2

The value of each function call is:

xp(plvl) = (plvl - 1) * ((plvl - 2) * iXPBumpBase / 2 + iXPBase)
xp(plvl + 1) = plvl * ((plvl - 1) * iXPBumpBase / 2 + iXPBase)

Performing this computation straight forward requires 10 additions or subtractions, 10 multiplications or divisions and 6 function calls. To avoid unnecessary computations we will optimize the calculation. The expression iXPBumpBase / 2 occur in both function calls. Hence we will compute the expression only once and use the result instead:

bump = 0.5 * getGameSetting iXPBumpBase
xp(plvl) = (plvl - 1) * ((plvl - 2) * bump + iXPBase)
xp(plvl + 1) = plvl * ((plvl - 2) * bump + iXPBase + bump)

The next expression that occurs in both function calls is (plvl - 2) * bump + iXPBase. Computing this expression as well only once will further optimize the calculation:

base = (plvl - 2) * bump + getGameSetting iXPBase
xp(plvl) = (plvl - 1) * base
xp(plvl + 1) = (plvl - 1) * base + base + plvl * bump

The last optimization left is to calculate the expression (plvl - 1) * base only once:

xp = (plvl - 1) * base
xp(plvl) = xp
xp(plvl + 1) = xp + base + plvl * bump

Replacing the function calls of the formula with the optimized calculations results in the following final formula:

perkXP = xp(plvl) + (xp(plvl + 1) - xp(plvl)) / 2
perkXP = xp + (xp + base + plvl * bump - xp) / 2
perkXP = xp + (base + plvl * bump) / 2

We reduced the number of required additions or subtractions from 10 to 5, the number of required multiplications or divisions from 10 to 5 and the number of required function calls from 6 to 2.

Just do it

With these optimizations in place, we are ready to implement the quest stage function definePerkXP. Open the G.E.C.K., select the quest stage 102 and make the associated script look like the image below.

The conditional block demarcated by the lines 07: if and 09: endif prevent the script from computing a value if the player level is outside of the boundaries defined by the function xp(plvl). The Player starts with level 1 and can't pick the Extra Perk before he reaches player level 2. Apart from that the Player can't be rewarded any further with additional perks after he got rewarded for the second last player level. Lines 10: - 13: compute the new value for the variable perkXP.

What's left is to initialize the newly introduced variable perkXP when the Player picks the Extra Perk. Modify the initializer (the quest stage with an index of 0) and make it look like the image below.

Save all the changes in the G.E.C.K. and start Fallout 3. Perform the following actions to verify that things work as intended:

  1. Load a save-game where the Player does not already possess the Extra Perk.
  2. Level the Player up by issuing the command advLevel using the in-game console.
  3. Pick the Extra Perk.
  4. Reward the Player with an amount of experience points, close to but lesser than the amount needed to hit the next player level, by issuing the command rewardXP <amount> using the in-game console.

The Player should be rewarded with an additional perk although he did not hit the next player level.

We should verify once more that the QWEExtraPerkQuest is terminated immediately after the Player has been rewarded with an additional perk for the second last player level:

  1. Load a save-game where the Player does not already possess the Extra Perk.
  2. Set the level of the Player to the third last possible player level (which is either 18 without Broken Steel or 28 with Broken Steel installed) by issuing the command player.setLevel <level> using the in-game console.
  3. Execute the actions 2 - 4 defined above once again.
  4. Issue the command showQuestVars QWEExtraPerkQuest using the in-game console.

You should observe that the QWEExtraPerkQuest is not running anymore.

Keep the World in balance

The final missing feature is the reduction of experience points by 50%. It is an attempt to balance the benefit of one additional perk per level by doubling the time required to hit the next player level.

This can be achieved by intercepting the game engine mechanism which rewards the Player with experience points. A perk is capable of intercepting this mechanism besides many others. The interception is defined in terms of a Perk Entry which in our case reduces the experience points to reward by multiplying it with 0.5.

Start the G.E.C.K. one last time and select the QWEExtraPerk. Add a new Perk Entry defining an Entry Point which adjusts the experience points rewarded by multiplying it with 0.5. Make it look like the image below and save all changes.

Start Fallout 3 and perform the following actions to verify that the experience points gained are half the experience points rewarded:

  1. Load a save-game where the Player does not already possess the Extra Perk.
  2. Level the Player up by issuing the command advLevel using the in-game console.
  3. Pick the Extra Perk.
  4. Open the pipboy and remember the amount of experience points the Player currently has.
  5. Reward the Player with experience points by issuing the command rewardXP 10 using the in-game console.

Open the pipboy once again and verify that the amount of experience points the Player has is by 5 greater than the amount of experience points the Player had in step 4.

That's it. Congratulations! You implemented every feature of the Extra Perk.

Conclusion

Finally we implemented all the requirements as stated in Part 1 of this tutorial. When computing new values we took care not to cause arithmetic underflows or overflows by respecting the boundaries as defined by the data type the computation was based on. Further we protected our scripts from computing new values when certain pre-conditions were not satisfied. To avoid wasting valuable resources, we optimized the computation of values. We used the interception mechanism provided by perks to modify the experience points before they were rewarded to the Player.

I hope you enjoyed this final post and all my previous ones. Feel free to contact me either by e-mail or leave a comment on the Fallout 3 Nexus Site. If you made it this far and liked my tutorial, please consider to endorse it.

The End

Logged Off: Harmlezz

02 December 2012

Become a Software Engineer by modding Fallout 3 - Tutorial Part 3

Welcome (back) to the third part of my tutorial Become a Software Engineer by modding Fallout 3. In this post I will explain how to add the missing functionality, of rewarding the Player with an additional perk whenever he levels up, to the Extra Perk Quest Script. Adding that behavior will cause some unintended and unwanted side-effects, we have to address later on. There will be many possible solutions to choose from, of how to compensate those side-effects. A good solution has to consider behavior, potentially introduced by other mods, which we can only assume. Finding the proper trade-off between correctness and efficiency will be the challenge in selecting a good solution. Scripting, awareness, reasoning and algorithms are the major topics of this post.

I expect you already know what I explained in Part 1 and Part 2 of this tutorial. If you intend to implement the Extra Perk by yourself, you have to catch up to the point where Part 2 of the tutorial ends.

Detecting if the Player leveled up

The way we had to implement tracking, as defined by the Extra Perk Quest Script, is called polling. Instead of getting notified when an event of interest happened, we have to check actively and repeatedly if an event occurred.

To detect if the Player leveled up, we have to remember the level he had before we ran the check. Remembering something means adding a variable to the Extra Perk Quest Script. The statement at line 1: int defines an integer variable playerLevel, which we use to store the last player level, already handled by the script. Whenever the level of the Player is greater than the level stored in playerLevel, he leveled up between the current and the previous check. The statements defined by the conditional block, demarcated by lines 4: if and 6: endif, will be executed only, if the condition player.getLevel > playerLevel is true. Besides doing something useful, we have to avoid rewarding the Player twice. Therefore we will reflect the detection and handling of the Player by increasing the value of playerLevel by 1 (as defined by line 5: set).

Start the G.E.C.K. and add the new lines to the QWEExtraPerkQuestScript. Make the script look like the screenshot to the right.

After adding the new lines, read the whole script once again. Is the condition defined by the second conditional block still proper in terms of our requirements? In my opinion it is not, after the introduction of the variable playerLevel. It should be rephrased as: stop the Extra Perk Quest Script when the Player has been rewarded with an additional perk for the maximum player level instead of: stop the Extra Perk Quest Script when the Player has leveled up to the maximum player level. It may seem to be a tiny difference, but some subtle bugs (which are the most difficult to find) stem from this kind of differences. Hence we will change the condition of the second conditional block from player.getLevel >= maxPlayerLevel to playerLevel >= maxPlayerLevel. I suggest you always read the whole script for which you introduced a new variable, as well as all scripts referencing any variable defined by that script, once again. The likeliness of find potential issues is high when inspecting scripts immediately after altering them.

Change the condition of the second conditional block in the G.E.C.K. as described above. What's left is to initialize the variable playerLevel with the current level of the Player, at the moment he picks the Extra Perk.

Select the stage with an index of 0 from the QWEExtraPerkQuest and add the statement set playerLevel to player.getLevel to its embedded script (the function acting as the quest initializer). Don't forget to save all changes made to the Extra Perk.esp.

Let's test the new behavior by starting Fallout 3 and loading a save-game where you have not already obtained the Extra Perk. I guess that Fallout 3 treats a save-game like a mod, placed last in the loading order. Hence objects contained in the save-game will override previously loaded objects. A save-game containing an old version of the QWEExtraPerkQuest would be associated with an old version of the Extra Perk Quest Script, not defining the newly introduced variable playerLevel. It's only a guess, but the effect is as described.

Open the in-game console and submit the command: advancePCLevel. The Level-Up-Dialogue should be displayed. Distribute the skill points and pick the Extra Perk. Open the in-game console again and submit the command: showQuestVars QWEExtraPerkQuest. The variable playerLevel should be displayed, having a value equal to the current Player's level, which means the quest initializer works as intended. Now set the Player's level to the same value assigned to the variable maxPlayerLevel by submitting the command: player.setLevel <level>. You should be able to observe that the variable playerLevel gets incremented by 1 every 10 seconds (the delay between two runs of the QWEExtraPerkQuestScript as defined by the QWEExtraPerkQuest). As soon as the value of the variable playerLevel is equal to the value of the variable maxPlayerLevel the QWEExtraPerkQuest will be stopped. This behavior would not be observable if we didn't changed the condition of the last conditional block from player.getLevel >= maxPlayerLevel to playerLevel >= maxPlayerLevel (you may try it).

Rewarding the Player with an additional perk

Finally everything is in place. We are ready to add the code necessary to reward the Player with an additional perk. But neither the G.E.C.K. nor FOSE provide a function to display the Perk-Selection-Dialogue. Hence we will level the Player up to force the Perk-Selection-Dialogue to be displayed as a side-effect. Afterwards we have to restore the Player's level to the level he had before.

How to level the Player up we already know (we submitted the command advancePCLevel many times using the in-game console). And how to set the Player's level to a specific value we know as well (we also submitted the command player.setLevel before). But there is one thing we have to consider: what if the Player leveled up to the maximum player level? Is it possible and safe to level him up once more? Decreasing the Player's current level first and leveling him up afterwards seems to be the better solution. Detecting that the Player leveled up implies he had a lower level before. Hence decreasing the current Player's level is always safe.

It is very important to be aware of the boundaries a variable defines for its value to be valid. The type of a variable defines the widest boundaries possible for a variable, but most often not all values inside those boundaries are valid. In our case only player levels between 1 and maxPlayerLevel inclusively are valid values for the variable playerLevel. Whenever we introduce a statement which assigns a value to a variable, we should ask ourselves:

  • Are we aware of the boundaries defined by the variable?
  • Does the new value respect the boundaries defined by the variable?
  • Where does the new value come from? Who calculated the new value?
  • Is it possible to verify that the calculated value is inside the boundaries?

Questioning the code you just created does reduce your productivity. But of which value is code, you are not confident about its correctness? My preferred way of adding new code is using the Test First approach. But this is not possible when modding Fallout 3 (besides porting the whole functionality to a language supporting Test First). So if you observe that debugging does follow your coding often, slow down your coding. Take your time and think more deeply about what you want to achieve before putting your fingers onto the keyboard again. Your productivity should increase.

Start the G.E.C.K., load the Extra Perk and alter the first conditional block as shown above. Don't forget to define the variable previousLevel as well. Save your changes and start Fallout 3. Load a proper save-game. Follow my instructions carefully to ensure, you will observe what I intend you to observe:

  1. Open the Pipboy and find the information on top of the screen, displaying the Player's current experience points (620 in this example) together with the experience points the Player requires to level up (1050 in this example). Calculate the difference, the amount of experience points required to level up (430 in this example), and write down the experience points required to level up (1050 in this example). Leave the Pipboy.
  2. Enter the in-game console and submit the command: rewardXP <difference>. Leave the in-game console.
  3. The Player should level up. Distribute the skill points and pick the Extra Perk.
  4. Open the Pipboy again and inspect the current experience points of the Player. They should be equal to the experience points he required to level up (as written down in step 1). Calculate the difference and remember the experience points required to level up once again. Leave the Pipboy.
  5. Enter the in-game console and level the Player up as described in step 2, using the newly calculated difference. Leave the in-game console.

The Level-Up-Dialogue should be displayed. After distributing the skill points and picking another perk, wait at most 10 seconds. The Level-Up-Dialogue should show up. If that happens, the Extra Perk does something we expected it to do. But after distributing the skill points (wait! we didn't intend to reward the Player with more skill points, did we?) and picking the additional perk, open the Pipboy and inspect the current experience points the Player has. They should be different from what you have written down.

Our current solution of how to reward the Player with an additional perk causes two side-effects, we are not interested in:

  • The Player's current experience points are modified.
  • The Player is rewarded with additional skill points.

Compensating missing experience points

On solution to adjust the modified experience points would be to reset its value to the value it had before the Extra Perk rewarded the Player with an additional perk. The G.E.C.K. provides a function setActorValue taking two input parameters: the state to be modified and the value to set the state to. For example, this function works well for all S.P.E.C.I.A.L stats, but sadly it does not for the XP state.

Another possible solution would be to add the difference between the experience points the Player had before the modification occurred and the experience points he currently has to his current experience points, using the function rewardXP. This is an option, because the modification always results in a reduction of the Player's experience points.

To reward the Player with an additional perk while preserving his experience points, we have to do something like this:

  1. Remember the Player's experience points
  2. Reward the Player with an additional perk
  3. Calculate the missing experience points
  4. Reward the player with the calculated difference

The requirement defined by step 2 is already implemented in terms of three statements, as defined by lines 06: - 08: of the QWEExtraPerkQuestScript. The complete algorithm would consist of six statements, if we were able to formulate the requirements defined by each of the remaining three steps by a single statement. All this statements together implement the high-level functionality of rewarding the Player with an additional perk.

The four steps formulated above are at different levels of abstraction. Step 1 is a technical prerequisite, required to calculate the difference between the experience points done in step 3. Step 2 is at the same level of abstraction as the level we formulated the requirements of the Extra Perk. And step 4 is at a lower level of abstraction than step 2, but at the same level as step 1 and 3.

If we would put all those statements into the conditional block, demarcated by the lines 05: if and 10: endif, it would be hard to recognize their higher level semantic. Moreover we would mix up different level of abstraction the QWEExtraPerkQuestScript would be composed of. Keeping all statements of a script at the same level of abstraction makes it more readable and hence more maintainable.

The complexity of a piece of software increases with the amount of responsibilities it has. Higher complexity always bears the risk of more hidden bugs. Thus we should strive to reduce the number of responsibilities for one piece of software whenever possible. But there is no simple rule when more than one responsibility is appropriate; it's a matter of good design.

Motivated by the reasoning and advices given, we will encapsulate the whole functionality, as defined by steps 1 - 4, by a separate script, associated with a quest stage (misusing the concept to implement something similar to a function).

Start the G.E.C.K. and load the Extra Perk.esp. Find the QWEExtraPerkQuest and open the edit dialogue. Select the Quest Stages tab and create a new Quest Stage with an index of 100. Add a new Log Entry and edit its associated script (as we did for the Quest Stage acting as the quest initializer) by adding all the statements shown in the script below. Let's have a closer look at what the script does:

Line 05: set stores the experience points the Player has before we reward him with an additional perk, in the local variable targetXP. The statements of lines 06: - 08: are equal to the statements of the same lines defined by the QWEExtraPerkQuestScript. Together they reward the Player with more skill points and an additional perk, while reducing his experience points. Line 09: set calculates the missing experience points and stores them into the local variable diffXP. Line 10: rewards the Player with the amount of experience points he lost, as stored in the variable diffXP.

If the G.E.C.K. would support naming a quest stage, we would name the stage with index 100 something like rewardPerk. To keep the tutorial more expressive, I will refer to the quest stage with index 100 using that name.

What's left is to call the quest stage function rewardPerk every time when we detect that the Player leveled up. Find the QWEExtraPerkQuestScript and make it look like the image to the left.

Now all statements of the script are at the same level of abstraction. The first conditional block (demarcated by the lines 07: - 10:) handles when and how often to reward the Player with an additional perk. The second conditional block (demarcated by the lines 11: - 13:) decide when to stop tracking the Player's level. All those statements are at a very high level of abstraction, just one level below the level we formulated the requirements.

If we wouldn't cache the maximum player level (which I did only to explain the use of an initializer quest stage) by in-lining the function call instead, the QWEExtraPerkQuestScript would define only one variable, the playerLevel, tracking the last player level we do not have to reward the Player with an additional perk anymore. Hence the QWEExtraPerkQuestScript has a single responsibility (besides terminating the execution of itself).

Start Fallout 3 and test if the experience points as well as the player level are unchanged after the Extra Perk rewarded the Player with an additional perk. After you verified that everything works fine, go and level up the Player once again. Surprise! The Extra Perk won't reward the Player with additional perks any further (even so the Extra Perk Quest is still running). The reason why this happens is because by default a quest does not allow a quest stage to be set repeatedly. To change that, we have to enable the option Allow Repeated Stages for the QWEExtraPerkQuest (available at the Quest Data tab of the quest dialogue), which implies that any script associated with a quest stage is run every time the quest is set to that stage.

I don't know why we have to decided, if a quest stage can be set repeatedly for a whole quest instead for every quest stage. In our case we don't want to allow setting the quest stage with index 0 multiple times, but we have to. Open the G.E.C.K. and enable the option of the QWEExtraPerkQuest. Start Fallout 3 again and verify the Extra Perk does reward the Player once for every level the Player gains after he picked the perk.

Expecting the unexpected

Our current solution of how to compensate the missing experience points (caused by leveling the Player first down and afterwards up) relies on the expectation, that the Player gains the exact amount of experience points we reward him with. The vanilla Fallout 3 has a perk Swift Learner, which gives the Player 10% more experience points per rank than he is rewarded with. This means, if the Player has both perks (the Extra Perk and Swift Learner) our current solution of compensating the missing experience points would give the Player too many experience points.

To verify my prediction, start Fallout 3 and pick the Extra Perk by leveling the Player up. Calculate the amount of experience points required to level the Player up once more. Remember the total amount of experience points required before rewarding the Player with the calculated difference. When leveling up pick the Swift Learner perk and wait for the Extra Perk to reward the Player with an additional perk. Pick the Swift Learner perk again (now the Player gains 20% more experience points). Afterwards check the Player's experience points, which should be larger than the experience points you remembered before rewarding him the last time.

We could fix our solution by taking into account, if the Player has obtained the Swift Learner perk and which rank. But what if some other mod would change the rewarded experience points as well? Whenever we detect a defect in one of our algorithms, we shouldn't fix it by simply addressing the special case that revealed the defect, but by addressing the root, causing the defect. In terms of our Extra Perk this means, we have to expect that the amount of experience points rewarded to the Player may be different from the amount of experience points he gained.

Compensating the missing experience points by guessing iteratively

Our second solution has to deal with an unknown function that may modify the amount of experience points before rewarding the Player. One thing we know about the function, is that it grows at most linear. This means, the resulting experience points calculated are always less than or equal to the product of a fixed multiplier m and the initial experience points. Or more specific: F(xp) = m * xp + c.

This knowledge can be derived from the functions provided by the G.E.C.K. to modify experience points by perks. Select the object category Perk and filter the list of objects by the prefix Swift. Open the Edit-Dialogue for the Swift Learner perk and double-click any of its Perk Entries. Inspect all available modifications by browsing through the drop-down menu labeled Function.

The image blow shows the new script for compensating the missing experience points after the Extra Perk leveled the Player first down and afterwards up again.

Before I start to explain the whole script in detail, I will outline its major structure. Lines 10: label 1 and 28: goto 1 demarcate a loop. The condition, if to continue executing statements inside the loop, is defined by line 11: if diffXP > 0. If the body of the loop is not entered, the execution of script will be terminated. The loop condition states: as long as the difference between the experience points the Player had before the Extra Perk did his job and the current amount of experience points the Player has is greater than 0, execute statements defined by the body of the loop.

Analyzing the script in detail

Lines 01: - 08: define and initialize local variables used by the script. The variable targetXP is not required but improves the readability of the script. It could be replaced by the alternative expression QWEExtraPerkQuest.targetXP which in my opinion is much too long. Its value is the amount of experience points the Player had before the Extra Perk reduced them.

The variable diffXP defines the missing difference of experience points between the target experience points and the experience points the Player has at the moment of the calculation. When this value is zero or less, the script has done its job. The variable xp defines the amount of experience points to reward the Player with. Its value reflects the best guess the script made based on information collected in the previous iteration. It gets initialized with 1, the smallest meaningful amount of experience points. In contrast the variable gainedXP holds the amount of experience points the Player gained (which could be different from the amount of experience points the Player was rewarded with). And the last variable gainRatio is the ratio between the experience points the Player gained and the experience points the Player was rewarded with. If the value of gainRatio is 1, the Player gained the same amount he was rewarded with. If it is for example 2, the Player gained double the amount he was rewarded with. It is a hint the script uses to predict the amount of experience points the Player will gain when rewarded the next time with an amount of experience points.

Lines 12: - 14: make sure the amount of experience points to reward the Player with is at least 1, the smallest meaningful amount of experience points to reward the Player with.

Line 15: rewards the Player with an amount of experience points while line 16: calculates the gained amount of experience points (which is the difference between the missing amount before the Player was rewarded and the missing amount afterwards).

Now the script tries to predict the amount of experience points to reward the Player with next, while avoiding to exceed the amount of target experience points. To achieve this, the script relays on the fact, that the function F(xp) does grow at most linear. The returned value of each such function is an integer value, while the calculated result most likely is a floating point value. Before the calculated result is returned, the floating point value is rounded up. We should consider two important cases for the function F(xp) = m * xp + c:

  • The values of the variable xp and of the multiplier m are small while the value of the constant c is large.
  • The values of the variable xp and of the multiplier m are large while the value of the constant c is small.

In the first case the returned value is dominated by the constant c which is much larger than m (the multiplier the script tries to find out). With increasing values of xp the dominance of c dims away. In the second case the returned value is dominated by the multiplier m regardless of the value of xp. But most importantly, in both cases the ratio between the experience points gained (the value returned by F(xp)) and the experience points rewarded (the value of the variable xp) is always greater than the multiplier m the script is in search for (ignoring negative values for constant c). And for increasing values of xp the ratio becomes either smaller or stays the same.

Lines 17: - 25: handle the cases when the experience points rewarded last lead to a positive gain of experience points. In that case the script calculates the changed amount of missing experience points (line 18:). If that amount is larger than or equal to the amount of experience points gained last (line 19:), than the value for the variable xp is set to the remaining amount of missing experience points diffXP divided by the gainRatio. Due to the fact, that the gain ratio will stay the same or becomes smaller, when the amount of experience points rewarded is increased, we will not exceed the target experience points.

Otherwise, if the missing amount of experience points is lesser than the last gained amount of experience points, we have to decrease the amount of experience points to reward the Player with. This could result in a larger gain ratio value, which we do not know. We could have stored the largest value for the gain ratio in another local variable, at the first time we rewarded the Player with 1 experience point, but in my opinion the increase of complexity and therefore reduction of maintainability isn't worth the gain of a slightly faster algorithm. Hence the script starts over to reward the Player with 1 experience point (line 23:) as it did when the statements of the loop body were executed the first time (lines 12: - 14:).

Lines 25: - 27: handle the case, when rewarding the Player with a positive amount of experience points results in a gain of zero experience points. This may happen only, if either m is zero or c is negative. If both is true, rewarding the Player with any amount of experience points always resulting in a negative gain (0 * xp is always zero and a negative c makes the result negative). If m is at least a positive number (even if less than 1) and c is a negative number, the result could become positive if the value of xp is large enough. To be more specific: if xp > abs(c) / m , where abs() is a function returning the absolute value of a given input value.

The risk taken, when doubling the value of xp in each iteration step, is a potential raise of the amount of experience points gained from zero to abs(c). This results from the following equation: F(xp) = m * xp + c <= 0 which is equivalent to m * xp <= abs(c). The worst case in terms of the largest possible amount of experience points gained by the Player, which exceeds the missing amount of experience points to compensate, is when both sides of the equation are equal and the value of xp is 1. Increasing xp to the next larger value 2 immediately cause F(xp) to return a value of abs(c).

On the other hand, if we do not double the value in each iteration step but increase it by 1 instead, the number of required iterations could become very large (consider m to be a very small value less than 1). We have to choose between two evils:

  • Try to make the smallest possible error by risking a very large number of iterations needed to compensate the missing experience points.
  • Hope the function F(xp) rarely returns non positive values, and in case it does, the value of m as well as the value of c is a small numbers.

In my opinion, the second case is much more likely to be introduced by other mods and perks. Most of the mods I know tend to increase the amount of experience points gained or reduce them slightly by some degree, but never eliminate them at all (setting m to zero). And I have never heard about a mod, removing a constant large amount of experience points (setting c to a large negative value). Hence I doubled the value of xp in each iteration step instead of increasing it by 1.

Wiring things together

What's left is to associate the new script with the stage 101 of the QWEExtraPerkQuest, which we have to create first. From now on I will refer to the script, associated with stage 101, using the name repairXP. In addition we have to change the script rewardPerk to look like the image to the right. The variable targetXP, which is set in the script rewardPerk and used in the script repairXP, has to be made accessible to both of those scripts. The G.E.C.K. does not support any mechanism for passing values around other than using some kind of global variables. Hence the QWEExtraPerkQuestScript has to define the variable targetXP. The local variable diffXP has been moved to the script repairXP, which took over the responsibility of compensating the missing amount of experience points. Make the script look like the image below.
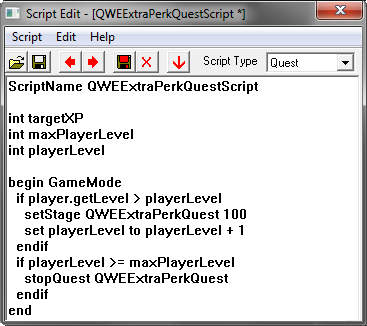
After saving all changes in the G.E.C.K., start Fallout 3 and repeat the procedure described at Expecting the unexpected. This time the effect should not be observable.

You may have noticed, that sometimes the Player has one more experience point than he had, before the Extra Perk rewarded him with an additional perk. The reason for it is, that Fallout 3 does round up the experience points calculated. For example, if the Player misses 1 experience point, the script repairXP will reward him with 1 experience point, which gets multiplied by the Swift Learner perk by either 1.1, 1.2 or 1.3. The result is a float value greater than 1 but lesser then 2, rounded up to 2. This effect can't be eliminated easily. Later in the game, gaining a few more experience points is not very significant. Hence we avoid addressing this effect, which would result in a much more complex script. Instead we ignore the effect.

Eliminating the reward of additional skill points

The second side-effect caused by leveling the Player up, is the gain of additional skill points each time the Extra Perk rewards the Player. To avoid this behavior we create the QWENoSkillPerk, which sets the skill points gained to zero. This perk we will add to the Player before the function call advancePCLevel (made in the script rewardXP), and remove it immediately afterwards.

Open the G.E.C.K. and create a new perk with an ID QWENoSkillPerk. Make sure the perk is not playable, which means it is neither visible nor can be picked in the Perk-Selection-Menu. Even so we remove the perk immediately after leveling the Player up, make the perk hidden to document that it is intended to be used as a function only.

Add a new Perk Entry with a Rank of 1 to the QWENoSkillPerk, adjusting the gained skill points to the fixed value 0, which effectively changes the Level-Up-Dialogue to a Pick-Perk-Dialogue.

What's left is to add the QWENoSkillPerk to the Player before leveling him up and to remove it immediately afterwards.

Select the QWEExtraPerkQuest and navigate to the Quest Stages tab. Open the script rewardXP and add the lines 06: and 08: to make the script look like the image below.

Save all the changes and start Fallout 3 to verify, that whenever the Extra Perk rewards the Player with an additional perk, no skill points are gained. But when the Player levels up, he is gaining skill points and has to pick one more perk.

Finally we implemented the reduced requirements as stated in Part 2 of this tutorial. We are done for now. There are more things left to be implemented in the future, in Part 4. Have a break and come back soon! I have already started to work on Part 4.

Conclusion

We added the behavior of rewarding the Player with an additional perk whenever he levels up. Our solution caused some side-effects, we had to eliminate. Because of the absence of information, we had to implement an algorithm that iteratively tried to guess how to compensate experience points, which got removed in the process of rewarding the Player. We used a perk to suppress the gain of additional skill points by dynamically adding and removing it to and from the Player.

What's left is to reduce the experience points gained when the Player has the Extra Perk. The additional perk has to be rewarded when the Player has collected at least half the experience points needed to reach the next level, instead of rewarding him immediately after he leveled up. All this is covered by the final Part 4 of my tutorial.

I hope you enjoyed this post so far. Feel free to contact me either by e-mail or leave a comment at the Fallout 3 Nexus Site. If you think this tutorial is worth to be recommended, please consider to endorse it.

Logged Off: Harmlezz

13 October 2012

Become a Software Engineer by modding Fallout 3 - Tutorial Part 2

This is the second part of my tutorial Become a Software Engineer by modding Fallout 3. If you missed to read the first part I would like to suggest that you read it before continuing, because this post expects you know already what I explained there.

In this second post I am about to explain how to add behavior to the Extra Perk mostly by developing scripts. On top you will get an introduction on how to install and use a Source Code Management System, which is capable of maintaining a persistent history of important states our mod was in. It enables us to restore the mod to any of those states later on. This tool eliminates the fear of breaking our mod when altering it while exploring new functionality or debugging strange behavior. Doesn't this sound like a comfortable position to be in?

If you intend to develop the Extra Perk (which I use as an example throughout this tutorial) you should set up a development environment as described in the first part and implement the features of the yet-do-nothing-perk to catch up to the point where this tutorial continues.

Let's recap what to expect from the perk

The requirements can be stated as follows: starting from the moment the Player picks the Extra Perk, he has to be rewarded with an additional perk once per player level, as soon as he gained at least half of the experience points needed to reach the next level. At the same time all experience points he gains have to be reduced by 50%.

Sticking to the Top-Down approach we have to think about the next smallest feature of value we have a good idea of how to implement it. Most often picking a major feature and reducing it repeatedly produces a small feature candidate. Let's try:

  1. Player is rewarded with an additional perk once per level after half of the experience points required for next level are gained.
  2. Player is rewarded with an additional perk once per level after experience points are gained.
  3. Player is rewarded with an additional perk once per level.

The last statement seems much less complicated than the first statement while still being part of the original feature. Another possible outcome as the last statement would have been:

  • Player is rewarded with an additional perk after experience points are gained.

Both statements are equally valid but the one above would be a little bit annoying (gaining so many additional perks). Therefore we pick the requirements of statement 3. as our next feature set to be added to the Extra Perk.

What does the blueprint look like?

In theory we would like to register some callback to the main loop (run by the Fallout 3 game engine) at the moment when the Player picks the Extra Perk, to be called on the event when the Player levels up. The functionality of the callback would be to call a function (provided by the G.E.C.K. API) showing up the Perk-Selection-Dialogue which is part of the level-up dialogues we all are familiar with.

But sadly the world is not shaped as we might wish. Using the mechanisms provided by the G.E.C.K. makes things a bit more complicated. Take a brief look at the diagram below:


What you see is the collaboration structure of four objects (belonging to three different object types) involved in detecting when the Player levels up. Let's have a closer look at each object and its responsibility.

The rectangle labeled Extra Perk is the perk object we created in Part 1 of this tutorial. It has a single responsibility: to start the script Extra Perk Quest Script which repeatedly checks if the Player has leveled up. But a perk object can't start a script by itself so we have to find another way to accomplish this.

Scripts are always part of a quest, an item or an effect object. Because of the fact, the Extra Perk has to start tracking the current level of the Player as soon as the Player picks the Extra Perk and stop tracking when the Player has reached the maximum player level, a quest is the proper object to attach the Extra Perk Quest Script to.

The rectangle labeled Extra Perk Quest is an object of type quest. Quests can be started either explicitly by calling the function startQuest or implicitly by setting the quest to one of its stages. When a quest gets started, the script attached to it will be run repeatedly until the quest is stopped. Knowing this, we can rephrase the responsibility of the Extra Perk object as: to start the Extra Perk Quest. This can be achieved by adding a perk entry which will set the quest to a stage, the one acting as the quest initializer, when the Player picks the Extra Perk.

A quest may define many stages to track the Player's progress. The Extra Perk has no need to track any progress but instead it needs to remember the level of the Player at the moment when he picked the Extra Perk. Because this has to be done only once, we will add a stage to the quest acting as an initializer, setting the variable, defined by the Extra Perk Quest Script, to the current level of the Player. The functionality of the initializer is defined by another script, embedded into the quest and associated with the initializer stage.

Perhaps you are now overwhelmed by my explanations, but be assured that things are not as scary as they might sound. I will guide you through everything in detail now, so: don't panic!

Starting the quest when picking the perk

To enable the Extra Perk object to start the Extra Perk Quest we have to create a quest object first. Start up the G.E.C.K. and mark the Extra Perk.esp as the Active File. Hit the button which will load the Extra Perk.esp file as well as the Fallout3.esm file (which is the Parent Master of the former).

Once all objects defined by both files are loaded, type QWE into the Filter field of the Object Window to filter out all objects not part of our Extra Perk mod. Select the object category Quest, which is a child of the object category Actor Data, right-click on the right panel and choose New from the context menu.

First we have to give the new quest object an Editor ID. To do that select the Quest Data tab and type QWEExtraPerkQuest into the field labeled ID. The Editor ID will be used later on by the Extra Perk object as a handle to refer to the Extra Perk Quest object.

Than we have to add a stage to the quest which for the moment will only start the Extra Perk Quest when set by the Extra Perk object. To achieve this select the Quest Stages tab, right-click on the left panel and choose New from the context menu. Leave the index number at 0 and hit the button.

The last thing we have to do is triggering the start of the Extra Perk Quest on the event when the Player picked the Extra Perk. This can be achieved by adding a quest perk entry to the Extra Perk object. Select the object category Perk which should show only one perk object on the right panel (the QWEExtraPerk) due to the QWE filter applied. Double-click the QWEExtraPerk to open the perk dialogue. Place the mouse inside the Perk Entries panel and right-click. Select New from the context menu.

Select the radio button labeled Quest and select from the drop-down menu the QWEExtraPerkQuest. Make sure the Rank is set to 1 and the Stage to 0. Hit the button. The Perk Entries panel should show one entry of type Quest (make sure your entry looks like the image displayed below).

 
Hit the button once again and save the mod. We are ready to load and test the mod. Start Fallout 3 loading the Extra Perk.esp mod as described in Part 1 of this tutorial. Load a proper save-game where the Player has not already picked the Extra Perk.

Open the in-game console and submit the following command: showQuestVars QWEExtraPerkQuest. The console should print the current state of the quest, indicating that the Extra Perk Quest is not running.
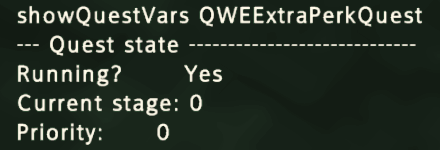
Submit the following command next: advLevel. This should level you up. Distribute your skill points and pick the Extra Perk.

Submit the command which shows the quest variables once again (as described above). Now the console should print the current state of the quest, indicating that the Extra Perk Quest is running.

We achieved our first goal, starting the quest when the Player picked the Extra Perk. Let's proceed with adding the script which repeatedly checks if the Player leveled up.

Running a script repeatedly

We managed to start the Extra Perk Quest. But without attaching a script to it no tracking will happen. Running a script repeatedly allocates a portion of available CPU time. We should always think about when to release a critical resource before even acquiring it. Consuming CPU time when none is required is as bad as allocating too much of it.

As soon as the Player reaches the maximum possible level (20 for vanilla Fallout 3 and 30 with Broken Steel installed) we should stop the Extra Perk Quest which implies not running the Extra Perk Quest Script anymore.

Next we have to answer the question: how long may we delay rewarding the Player with his additional perk? The answer will define the amount of seconds we wait between two checks, detecting if the Player leveled up.

In my opinion 10 seconds should be fine, because while in combat nobody wants to get disturbed by a Level-Up menu displayed. And outside of combat nobody should really care about getting his additional perk 10 seconds later if it is unlikely that meanwhile a fight might happen. And gaining experience points from fighting is the main source to consider.

Having found two important answers, we are now ready to implement tracking the Player's current level. Start the G.E.C.K. as always and ease your development by using QWE as the infix to filter objects displayed in the Object Window. Select the object category Script, which is a child of the object category Miscellaneous. Place your mouse inside the right panel, right-click and choose New from the context menu.

An empty scripting editor should open up. To define the Editor ID for a script the first line must start with the command ScriptName followed by one space and the Editor ID we want the script to be identified by. To be able to attach the script to a quest object, we have to change the Script Type to Quest, using the drop-down list located in the middle of the scripting editor's toolbar. Hit the save button located on the left side of the scripting editor, which will compile the script but does not save it! Leave the scripting editor and hit the save button of the G.E.C.K. to save the newly created script object to the Extra Perk.esp file. We just created the yet-do-nothing Extra Perk Quest Script.

Open the Extra Perk Quest object by double-clicking it. Located at the top-middle of the dialogue window you will find a drop-down list labeled Script. Select the entry named QWEExtraPerkQuestScript to attach the Extra Perk Quest Script to the Extra Perk Quest. Just below the drop-down list you will find a check-box labeled Script Processing Delay. If checked, uncheck it and enter the number 10 into the field labeled Default to the right. Hit the button and save the changes to the Extra Perk.esp file.

By ticking the check-box, the script attached to the quest will run every 5 seconds (the initial default value of fQuestScriptDelayTime defined by the file FALLOUT.INI). In my opinion it does not make much sense to rely on a default value that might change. When you have to decide if the default value is appropriate, you need to know to which value it is currently set. If changed later on, the criterion we used to make our decision is of no value anymore. Why would we ever want to use the unreliable default value? I do not know.

Taking care of critical resources

The Extra Perk Quest Script will run every 10 seconds after the Extra Perk Quest was started, infinitely! To change this we have to add an execution path to the script, to stop the Extra Perk Quest as soon as the Player reaches the maximum player level. Let's discuss the script in detail.

Line 1: int declares a variable of type integer, which can be referenced by the identifier maxPlayerLevel (within the same script). A variable is a storage location able of holding information of some type, which can be read and modified. In our case the information is an integer value. When declared, the value of an integer variable is 0. Later on we will assign the maximum player level to the maxPlayerLevel variable, immediately before starting the Extra Perk Quest.

Line 3: begin and 7: end demarcates a block of statements to be executed sequentially from top to bottom. A script may be composed of more than one block, each defining a different block type. The block type acts as a condition, expressing the expectation about a context to exist, when the statements of the block are executed.

The block type GameMode defines the context when (for example) the Player is exploring the world by moving around or is fighting enemies. It seems that GameMode is the proper block type for our script, because it is the same context Fallout 3 chooses to display the Level-Up dialogue. Rewarding the Player with an additional perk will use that dialogue as well.

Line 4: if and 6: endif demarcates a conditional block, to be executed only if the boolean expression (the condition) evaluates to true. In our case the boolean expression is player.getLevel >= maxPlayerLevel.

The identifier player is globally available in all scripts. It is a variable of type reference, holding the memory address the player object is stored at. The dot separates the identifier from the function to be called, using the reference as a parameter. Literally player.getLevel means: get the current level of the Player. And more general R.F means: call the function F and pass the reference R as an input parameter to F.

The operator >= checks if the term to its left is either greater than or equal to the term to its right. Therefore the statements inside the if - endif block are executed only if the level of the Player is greater than or equal to the value stored in the variable maxPlayerLevel (which we will initialize to the maximum possible player level later on).

You may ask why we use the operator >= instead of the operator ==, which checks if the term to its left is equal to the term to its right, when the player level can't be greater than maxPlayerLevel? This is the result of defensive programming. If the program (Fallout 3 and all the plugins installed) has a bug, and the player level is raised above the maximum player level (which some plugins do), we could miss the moment when to stop the script. The world is not perfect, so better be safe than sorry.

When the Player reaches the maximum player level, we stop the quest. We don't like to reward the Player with additional perks. Stopping the quest implies stopping the script, which means we stop consuming valuable CPU time. The statement stopQuest QWEExtraPerkQuest does exactly that. The function stopQuest expects one input parameter, a handle to the quest to be stopped.

Add all lines to the Extra Perk Quest Script. If you can't remember how to, read the previous chapter once again. Don't forget to save the script (which only compiles it) and save the mod.

Initializing the quest script

What's left is initializing the quest script. It won't work correctly as long as the variable maxPlayerLevel is not set to the maximum player level.

There are two common approaches to implement a do-once-task: embedding the initialization code into the script defining the variable, guarded by a conditional block that ensures the initialization takes place exactly once, or defining a stage, acting as the script initializer, triggered when the quest gets started.

The first approach increases readability by placing the initialization code close to the code where the variable is defined. But it requires to define an additional variable (acting as a flag) only to track if the initialization took place or not. It also introduces a conditional block which gets evaluated every time the script is run.

The second approach increases complexity while distributing the initialization code and the definition of the variable to two different places. But if the execution stack is easily remembered,

  1. Obtaining a new perk rank activates perk entry
  2. Perk entry does set quest to initializer stage
  3. Initializer stage runs associated stage script
  4. Stage script initializes quest script variable

each object participating in the collaboration has a well-defined responsibility. The do-once-task gets executed once without the need to add additional code to make this happen. Less code means fewer opportunities to add bugs as well as better maintainability. Reuse of mature code is less likely to have bugs than code freshly introduced.

We already added the initializer stage (the one with an index of 0) to the Extra Perk Quest, triggering the start of the quest. Now we will associate a script with the stage, getting executed when the quest is set to the stage.

The script consists of only one statement (as shown above) which initializes one variable. The pair of commands set and to assigns a value to a variable.

The variable we want to assign a value to is defined in a different script, so we have to refer to it using a fully qualified name. A script of type Quest is treated as belonging to the quest it is assigned to (each quest gets its own instances of the variables defined by the script). Therefore we have to qualify the variable identifier maxPlayerLevel by the Editor ID QWEExtraPerkQuest, being the handle of the quest, the script belongs to.

The value we want to assign to the variable is a value defined by the variable iMaxCharacterLevel, part of the game settings of Fallout 3. Those variables can be accessed using the function getGameSetting expecting one input parameter, the identifier of the variable for which to return its value. So identifiers of variables part of the game settings do not fetch their values, but are used as handles passed to the function getGameSetting which fetches their values instead.

It is questionable if caching the value of the game setting variable iMaxCharacterLevel is the right thing to do. If the value would be changed (for example by installing the DLC Broken Steel), the value stored in the variable QWEExtraPerkQuest.maxPlayerLevel would remain unchanged. I leave it to you to remove the definition of the variable maxPlayerLevel from the QWEExtraPerkQuestScript and replace all its occurrences with the function call getGameSetting iMaxCharacterLevel as a practice. The tutorial will continue using the variable maxPlayerLevel to explain how scripts associated with stages work.

Open the QWEExtraPerkQuest object in the G.E.C.K. by double-clicking it and switch to the stage tab by clicking the button at the top of the window. Select the stage having an index of 0 (which acts as the initializer), place the mouse inside the Quest Stage Items panel to the right, right click and select New from the context menu showing up. Make sure the newly created Log Entry it is selected and open the associated script by clicking the button located to the right of a panel labeled Result Script.


Add the single statement to the embedded stage script and hit the button. Close the quest object dialogue and save the mod.

Start Fallout 3 loading the Extra Perk.esp as well. Load a proper save-game and enter the in-game console once again. Submit the command: advLevel and pick the Extra Perk after distributing all skill points. Now submit the command: sqv QWEExtraPerkQuest which should display the value of the maxPlayerLevel variable together with the running status of the quest. The variable was initialized by the script associated with the quest stage having an index of 0.

Now submit the command: player.setLevel 30 (or 20 if Broken Steel is not installed). Leave the console and wait about 10 seconds. Enter the in-game console again and check the quest variables one more time. You should be able to inspect that the quest is not running anymore. If this is the case, the statements defined by the conditional block of the QWEExtraPerkQuestScript were executed, as intended. Congratulations!

Conclusion

We established the collaboration structure composed of four objects, required to repeatedly run a script, started when the Player picked the Extra Perk and stopped when the Player reached the maximum player level. We took care to acquire not too much CPU time and stopped consuming CPU time as soon as the perk completed his task.

I promised to explain more in this post than I have. But the post has already grown to a size much larger than anticipated by me (although I skipped some topics about software engineering I would have liked to explain). The other topics will not be skipped but postponed to Part 3 of this tutorial.

I hope you enjoyed this post nevertheless. Feel free to contact me either by e-mail or leave a comment at the Fallout 3 Nexus Site. If you think this tutorial is worth to be recommended, please consider to endorse it.

Logged Off: Harmlezz